
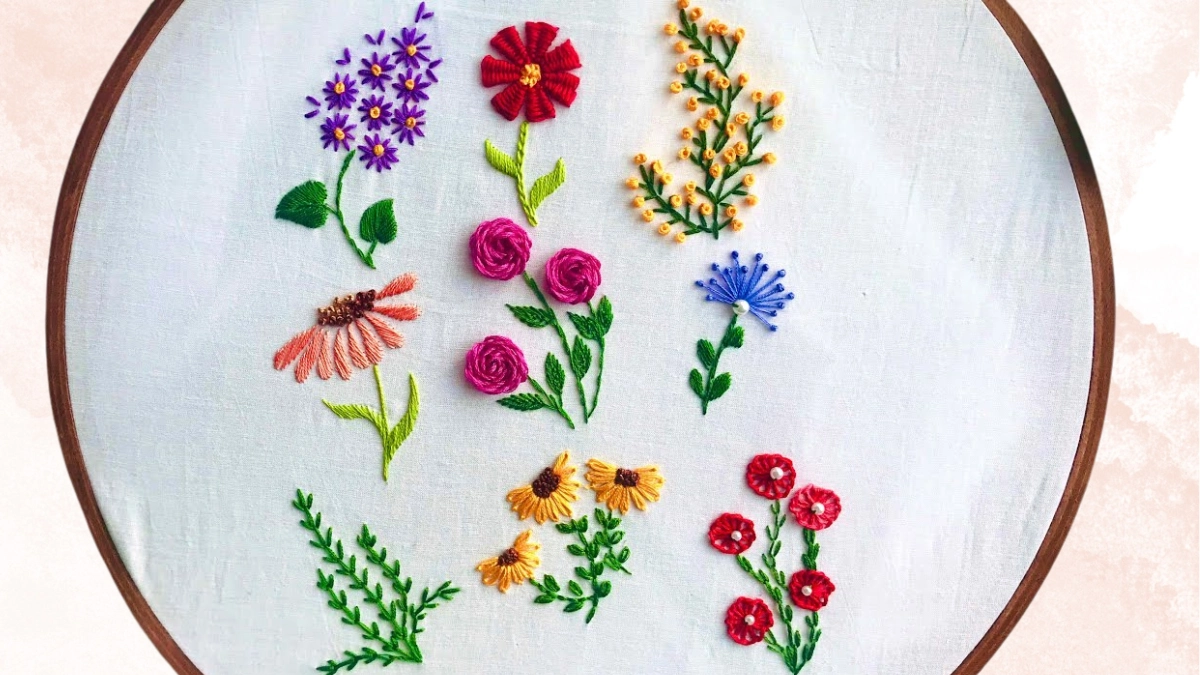
Have you ever thought about adding a special touch to your clothes with your flower embroidery?
It’s easier than you think! This article will take you through making nine different flowers, one by one.
It doesn’t matter if you’ve never embroidered before or if you’ve done it lots of times—there’s something new for you here.
I’ll guide you through each step on how to embroider different flowers. When we’re done, you’ll be ready to decorate all your favorite things with your embroidery.
Let’s get our needles ready and start the simple floral hand embroidery for beginners.
Table of Contents
- 1 Embroidery Basics for Flowers
- 2 Common Floral Patterns
- 3 Designing Your Flower Embroidery
- 4 Starting with Simple Flowers
- 5 Intermediate-Level Flowers
- 6 Advanced Embroidery Flowers
- 7 Shading and Color Blending
- 8 Finishing Touches and Presentation
- 9 FAQs on How to Embroider Different Flowers
- 9.1 Can I use a split back stitch for detailed flower embroidery?
- 9.2 What stitch length should I use for embroidering small flowers?
- 9.3 How do I create a 3D effect on embroidered flowers?
- 9.4 Where can I find a good embroidery tutorial for beginners?
- 9.5 How do I embroider flowers along the neckline of a dress?
- 9.6 I’m new to embroidery; how can I learn how to make embroidery flowers?
- 10 Final Thoughts
Embroidery Basics for Flowers
Embroidery involves a variety of stitches to create diverse flower designs. This section provides a step-by-step methodology for crafting delicate petals, stems, and the commonly utilized stitches for flower embroidery to ensure accuracy in your embroidery work.
Embroidery Stitches for Flower Embroidery
Embroidery is an art that turns thread and needlework into stunning designs, and when it comes to flowers, the right stitches can bring your work to life.
Each stitch serves a unique purpose, and knowing when to use them can elevate your embroidery from simple to spectacular. Whether you’re outlining petals or filling in leaves, there’s a stitch for every detail.
Below is a table of the most popular stitches to hand embroider flowers, their purposes, and the best places to use them to create beautiful, blooming patterns on your fabric.
| Stitch Name | Purpose | Best Used For |
|---|---|---|
| Running Stitch | Basic outlining and detailing | Outlining petals and stems |
| Back Stitch | Strong lines for definition | Defining the edges of leaves and petals |
| Satin Stitch | Smooth, flat areas of color | Filling in petals and leaves |
| French Knot | Small, round, raised dot | Creating centers of flowers or texture |
| Lazy Daisy | Looped petals and leaves | Petals and small leaves |
| Chain Stitch | Decorative lines and outlines | Outlining and texturing flower parts |
| Stem Stitch | Creating fine lines for stems and vines | Stems, vines, and fine details |
| Fishbone Stitch | Leaf filling with a natural, veined look | Filling in leaves with a realistic effect |
| Bullion Knot | Creating long, rolled texture | Textured centers and elongated petals |
| Long and Short Stitch | Graduated filling for shading | Shaded petals and dimensional effects |
| Outline Stitch | A variation of the stem stitch for crisp lines | Outlining shapes and adding definition |
| Blanket Stitch | Edging stitch that creates a border | Edging petals or creating a decorative frame |
| Cross Stitch | X-shaped stitches for filling and patterns | Creating detailed and pixelated flower designs |
Remember, the beauty of embroidery lies in the way you blend these stitches to create depth and dimension in your floral designs. Practice each stitch and watch your garden of embroidered flowers bloom with character and style.

How to Embroider Flower Petals
One begins by marking a circle on the fabric to outline petals. A straight stitch is employed by inserting the needle in the middle and extending outwards to the circle’s edge to form individual petals. This process is repeated until the desired fullness is achieved.
How to Embroider Stems
To embroider a stem, one typically uses a stem stitch. To execute, bring the needle up from the back of the fabric. Reinsert the needle a short distance away, then bring it back up midway between the two points, creating a slight overlap. This produces a twisted, rope-like effect.
Which Stitch is Usually Used for Flower Stems?
The stem stitch is commonly used for creating flower stems due to its strong and textured appearance, suitable for straight or curved lines. It is a preferred choice for both durability and aesthetics in stem embroidery.
Materials for Flower Hand embroidery
Before you start stitching your floral designs, make sure you have the following items:
- Embroidery hoop: Keeps your fabric taut and makes it easier to work on.
- Embroidery needles: A selection of sizes to suit different threads and fabric types.
- Embroidery floss: A variety of colors to match the natural hues of the flowers you’re creating.
- Fabric: Choose a piece large enough for your design, with a tight weave like cotton or linen.
- Scissors: A sharp pair for cutting thread and trimming fabric edges.
- Transfer tools: Pencils, pens, or transfer paper to outline your design on the fabric.
- Stabilizer (optional): Provides additional support to the fabric, useful for delicate or stretchy materials.
- Thimble (optional): Protects your finger when pushing the needle through the tough fabric.
With these materials at hand, you’ll be well on your way to stitching beautiful, hand-embroidered flowers.
Common Floral Patterns
Embroidery offers an array of floral designs, each with its distinct techniques. Common floral patterns often begin with the basics, such as eyelets and tiny flowers, which can be both adaptable to various embroidery projects and appealing to beginners due to their simplicity and elegance.

How to Embroider Eyelet Flowers
Eyelet flowers are characterized by their open center, resembling the eyelets in fabric. They begin by marking the center of the flower on the fabric. Stitchers can create these flowers by making straight stitches from the outer edge towards the central point, similar to the rays of the sun. LoveCrafts highlights the ease of creating straight stitches to form the petals of an eyelet flower.
How to Embroider Tiny Flowers
Tiny flowers are often used to add delicate detail to embroidery. They usually consist of small, simple stitches clustered to resemble a floral shape. Stitches like the French knot or detached chain (also known as a lazy daisy) are often found in instructions for creating such minute blooms.
These stitches allow for quick and effective flower embroidery, enabling even novices to achieve professional results. For further guidance, embroiderers can refer to Suite 101 which offers a variety of patterns and designs tailored for those beginning their embroidery journey.
How to Embroider Wildflowers
Moving on to the charm of the outdoors, let’s tackle how to embroider wildflowers, those spontaneous bursts of nature that captivate with their simplicity and elegance. Begin by lightly drawing your wildflower scene onto your fabric as a guide.
Employ a mix of the lazy daisy stitch to mimic petal shapes, the French knot for textured centers, and the stem stitch to create slender, graceful stems. With these techniques, your embroidery will blossom into a vibrant homage to the wild beauty found in nature’s own gardens.
Designing Your Flower Embroidery
When starting with flower embroidery, the artist must first conceive a visually appealing design and then accurately transfer it to the fabric, setting the stage for their intricate work.
Flower Embroidery Designs
Selecting the right flower embroidery design is crucial. It should reflect the embroiderer’s skill level and the intended use of the embroidered item. For beginners, one may opt for a simple straight-stitch flower, which involves marking a circle and creating stitches from the center to the outline. More experienced embroiderers might incorporate diverse stitches like the French knot for small details or satin stitch for smooth, filled petals.
To inspire creativity, many designs are available such as the beautiful ways to stitch embroidery flowers, which showcase a variety of styles that can adorn various parts of clothing or home decor. Another resource is the free design PDF for hand-embroidered flowers, perfect for practice or final projects.
Transferring the Pattern to Fabric
Once the design is selected, transferring the pattern onto the fabric accurately is essential for a successful embroidery project. The process often starts with a pencil or washable fabric pen to sketch the outline onto the material.
One can use stencils or freehand methods depending on their comfort level and the precision required. For guidance, wikiHow provides a guide on how to embroider flowers, including tips on transferring and stitching flowers.
The key is to ensure the marks are clear but not permanent, as they’re meant to guide the needle without leaving any trace once the embroidery is complete. It’s a delicate balance between visibility and erasability, vital for a polished result.
Starting with Simple Flowers
Embroidering simple flowers is an excellent entry point for beginners to learn the art of embroidery. These patterns can often be completed with basic stitches, allowing newcomers to gain confidence and skill before tackling more intricate designs.

Daisies
To embroider daisies, one should use the lazy daisy stitch, which is a loop stitch that’s perfect for creating individual petals. Start by pulling the thread up at the base of the petal, create a loop, and then anchor the thread back down at the starting point. Further guidance can be found through a step-by-step method on how to embroider daisies.
Poppies
Poppies can be vividly brought to life using a combination of straight and satin stitches. The center of the poppy utilizes French knots for added texture. For beginners looking to embark on embroidering poppies, detailed instructions are accessible at LoveCrafts’ tutorial on embroidering various flowers.
Tulips
Embroidering tulips typically involves using a stem stitch for the stalks and leaves, and petal shapes can be filled with a satin stitch for a smooth, polished look. The specific shapes and stitches suited for tulips can be explored through video tutorials, such as this one that covers four types of flower embroidery.
Intermediate-Level Flowers
Embroidery enthusiasts looking to enhance their skill set will find intermediate-level flowers like roses, sunflowers, and irises to be both challenging and rewarding. These flowers require a more complex mix of stitches and techniques to accurately portray their intricate details.

Roses
To embroider a rose, one must master the art of shading and dimensional stitching. Crafters typically use the woven wheel stitch to create the rose’s full, round petals. Starting with a small circle as the base, they work outward in a spiraling pattern, allowing the thread to build on itself to form a raised effect.
Sunflowers
Creating embroidered sunflowers involves capturing their bold and bright appearance. Embroiderers often use a combination of long and short stitches for the petals, providing a gradient texture resembling the sunflower’s natural gradation. The center can be brought to life with French knots or seed stitches to mimic the look of the seeds.
Irises
Irises demand attention to the unique shape and structure of their petals. One approach is to outline the petals with backstitch and then fill them in with a satin stitch, carefully following the curves to give the illusion of the petal’s natural fold. The use of contrasting colors helps to highlight the iris’s characteristic lines and patterns.
Advanced Embroidery Flowers
Embroidering intricate flowers like orchids, peonies, and chrysanthemums requires a mastery of needlework and an understanding of the flowers’ delicate details. One must balance color, texture, and stitch type to replicate the nuanced features of each bloom.

Orchids
Orchids are distinguished by their bilateral symmetry and demand careful shading to capture their exotic appearance. An embroiderer typically uses satin stitches along with straight and detached chain stitches to create the orchid’s signature column and vibrant petals. The technique of thread painting is often employed to achieve the subtle gradients and shading that give the flower its lifelike quality.
Peonies
Peonies, with their full and lush appearance, are challenging due to the layers of petals. Padding stitches reinforce the peony’s voluptuous form, while split stitches and French knots build up texture. Artists might combine stitch direction and color layering to mimic the density and depth of a peony’s petals.
Chrysanthemums
The intricate petals of chrysanthemums require an array of stitches to create their frilled edges. Long and short stitches can be employed for the inner petals, with fly stitches used to form the fringed outer layers. Implementing variegated threads can also help to mimic the natural color transition seen in many chrysanthemum varieties.
Shading and Color Blending
When embroidering flowers, the artist’s ability to shade and blend colors is paramount to achieving a realistic or dynamically stylized look. Shading employs various embroidery techniques to create the illusion of depth and dimension. Color blending, on the other hand, involves the gradual transition between colors to mimic the natural gradients found in petals.
Techniques for Shading:
- Layered Density: Start with a dense fill in the darkest area, then overlay lighter densities extending outwards.
- Saturation: Use darker shades of thread to add depth, especially toward the center of a flower.
Pro Tip: Align stitches in the direction that the petal grows to add to the natural appearance.
Approaches to Color Blending:
- Long and Short Stitch: Ideal for smooth transitions in hand embroidery, utilizing alternating lengths of stitches in different colors.
- Thread Mixing: Machine embroiderers often use multiple threads in a needle to create an intermediate color.
Choosing Colors:
- Select hues that naturally occur in the flower species being depicted.
- For cooler shading effects, opt for blue-gray tones when working with dark colors like black.
Remember, practice and patience are key to mastering these techniques. With time, one can create embroidered flowers that are vibrant and lifelike, showcasing the complexity of nature’s colors.
How to Embroider Simple Flowers
One can start creating simple flowers with techniques like the straight stitch. Basic shapes such as circles or lines serve as a guide to forming the flower’s structure. For a comprehensive tutorial on straightforward embroidered flowers, enthusiasts can turn to resources like this YouTube guide on 10 easy embroidered flowers.
Finishing Touches and Presentation
When one completes the embroidery of flowers, the final steps are crucial for both the longevity of the piece and its visual appeal. Here are concise instructions to ensure a polished result:
- Trimming: Excess fabric should be carefully trimmed away. One must ensure not to cut too close to the stitches to avoid fraying.
- Ironing: It’s advisable to gently iron the embroidered piece from the reverse side, placing a protective cloth over it to prevent direct contact with the iron.
- Mounting: For display, the embroidery should be mounted smoothly on foam board or within an embroidery hoop. Ensure the fabric is taut and even.
- Sealing: If maintaining the piece within a hoop, the back can be sealed with a circle of felt, affixed with fabric glue around the edges.
- Framing: When framing, choose a frame that complements the work. A mat border can highlight the embroidery without crowding it.
These steps ensure that the embroidered flowers are not only finished securely but also displayed in a manner that highlights their beauty. Proper presentation takes the piece from a mere craft to an admirable work of art.
FAQs on How to Embroider Different Flowers
Can I use a split back stitch for detailed flower embroidery?
Absolutely! The split back stitch is perfect for adding fine details to your flower designs, creating a textured outline that enhances the overall look.
What stitch length should I use for embroidering small flowers?
For small flowers, a shorter stitch length is recommended to maintain precision and control over the shape and detail of your embroidery.
How do I create a 3D effect on embroidered flowers?
To achieve a 3D effect, layer your stitches and use varying shades of embroidery floss. Techniques like the satin stitch or French knots can add dimension and make your flowers pop.
Where can I find a good embroidery tutorial for beginners?
Look for beginner-friendly embroidery tutorials online that offer step-by-step instructions and clear visuals. Many tutorials cater specifically to flower embroidery for first-timers.
How do I embroider flowers along the neckline of a dress?
Start by sketching your design on the neckline, then use a stabilizer to support the fabric. Choose stitches that complement the curve and style of the neckline for an elegant finish.
I’m new to embroidery; how can I learn how to make embroidery flowers?
Begin by practicing basic stitches with an embroidery tutorial, and then progress to more complex flower patterns as you gain confidence and skill.
Final Thoughts
To wrap it up, embroidering flowers is a fun way to make your clothes and things look special. All you need is to learn a few stitches, practice a bit, and use your imagination.
You can make beautiful flower designs on almost anything. So grab your needle and some colorful threads, and start making your flower patterns.


